Bird House
 Cut
two pieces of wood that are 10cm by 15cm. These are the
SIDE
pieces. Numbers 1 and 2. Cut
two pieces of wood that are 10cm by 15cm. These are the
SIDE
pieces. Numbers 1 and 2.
Cut a piece
of wood that is 15cm by 15cm. These is the
BASE
of the bird house. Number
3.
Cut two
pieces of wood that are 14cm by 12cm. These
are for the
ROOF.
Numbers 4 and 5.
Cut two
pieces of wood that are both 15cm by 22.5cm. These are for the
FRONT
and the BACK
of the bird house. Numbers 6 and 7. See figure nª 2
Take piece
number 6, the front of the house. Mark a point halfway along the
15cm edge. That's 7.5cm from the corner. Mark another point 7.5cm
from the same corner, but along the other edge. Join these two marks
with a line. Cut along this line. Repeat this with the opposite
side.
Repeat step
5 with piece number 7.
Now we are
going to make a hole in the middle of the front piece. Find the
middle of the rectangular part of piece number 6. Use your compass.
Set it at 3cm. Place the point in the centre of the rectangle and
use it to draw a circle of diameter 6cm.
Drill a
hole in the centre of this circle.
Cut out the
circle using a saw.
Use
sandpaper to make the wood smooth and get rid of the splinters.
Remember to follow the grain of the wood so you don't scratch it.
Use a
hammer and nails to fix together the different parts of the bird
house. You can use glue if you prefer. Or you can use glue first and
hammer some nails in later.
Coat the
house with plastic to protect it from bad weather.
Decorate your bird
house. Think carefully about the colours you use. This house is for
birds. You want birds to use it. If you use very bright colours the
birds will be frightened away. Think like a bird. Use natural
colours. Perhaps you can paint leaves or flowers on it.
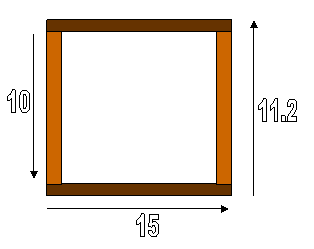
Figure nº2 This is a cut of the house ( wall
cut )
|


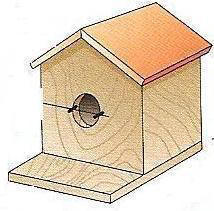 Figure
nª 1
Figure
nª 1