Inkscape. Vectorial graphics program
![]()
This is the other big graphics program using mathematical formulas. The first example is to create a toothed wheel or gear to make a simple mechanical transmission. Let’s star with a small manual
1st Path Operations
There are a number of commands which we can use to form new forms from two or more forms. The idea is: You have a rectangle and a circle and if you, for example, add or mix them together, you can create something like a “Chupachus”. Do you get the idea?
1stUnion: (Ctrl++): A new path (form) is created, containing all the interior areas of the original paths.
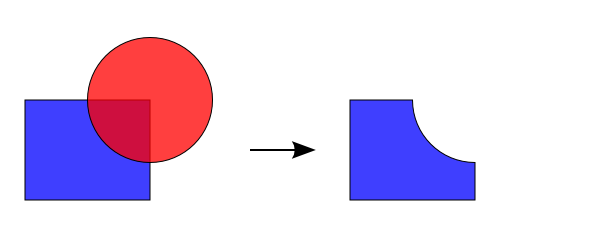
2nd Difference: ->path->Difference or (Ctrl+-): The difference of two paths. The area of the top path ( red area ) is removed from the bottom path ( blue area).
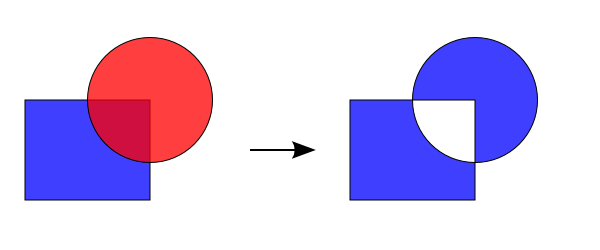
3rd Intersection: The new path encloses the common area of the original paths.
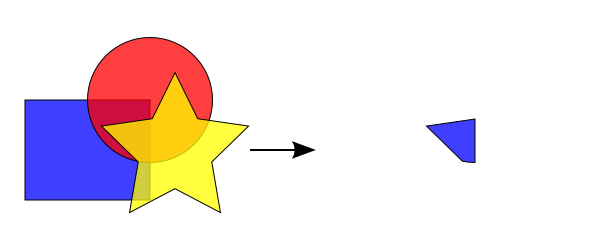
4th Exclusion: The new path is created containing both areas except the non-overlapping area.
A bit of practice:
Drawing a Gear
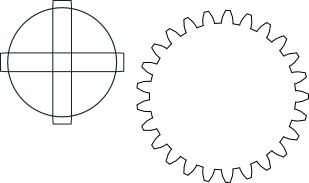
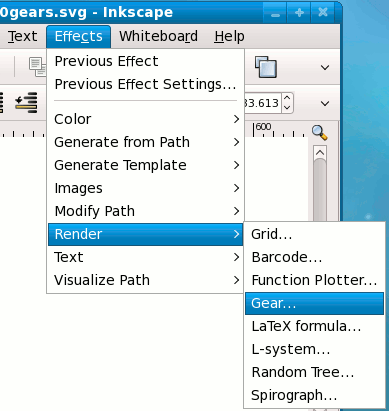 1st Step: Go to File->new->Default. Then go to Effects->Render->Gear. Have a look at image at the image on the left.
2nd Step: In the Gear menu, set the following values:
Number of teeth: 25:
Circular pitch: 20
Pressure angle: 20
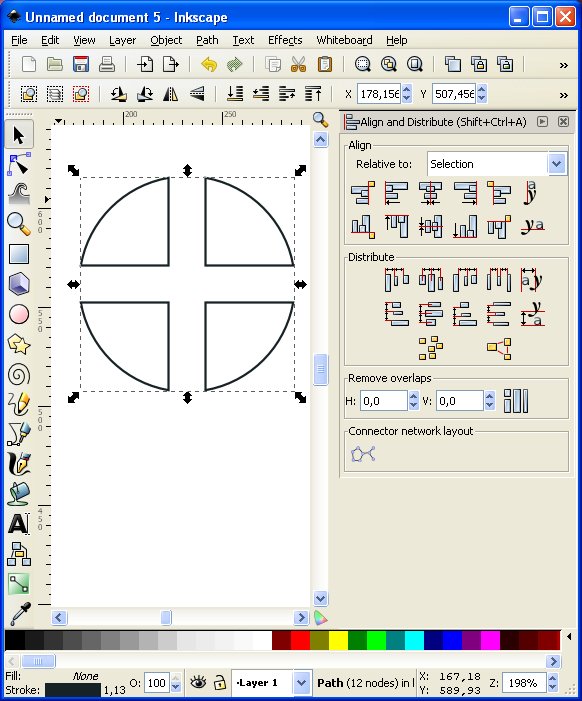
3rd Draw a rectangle and adjust it in the middle of the wheel. Use ->Object->Align and distribute ( see figure 1 ). Red marks. Duplicate that rectangle and rotate it 90º. Then align all the objects (except the wheel )
4th
Step 5: Now select a rectangle and the circle ( Use letter cap + the object ). Later go to Path->Difference.
Difference. Repeat with the other rectangle and the circle. The next image shows how that piece should be.

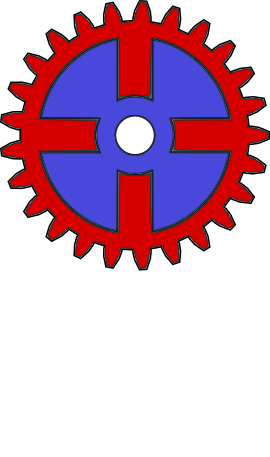
Step 6: Align all the objects and create a small circle in the middle of the wheel,( be sure X and Y have the same value ). Then align it in the centre and make another union.
Step 7: A last circle for the axle to go into and colour the wheel
Moving gears
First of all go to the inkscape program and open a new file.
Step 1: Go to ->File->New_> Default
Step 2: Create the fist toothed wheel. Go to ->Effects->Render->Gear, as shown in the next image
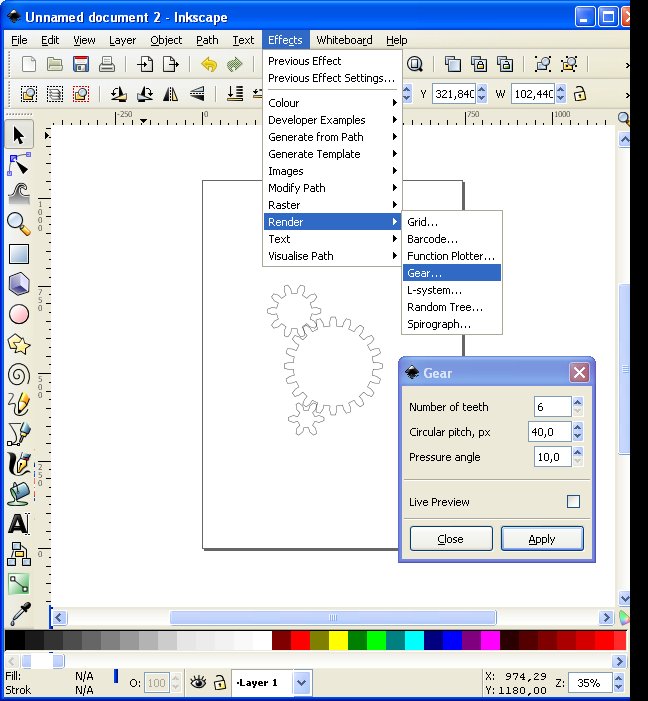
Step 3: A menu will be opened to set the gear parametres. We are going to draw three gears with 6, 20 and 10 teeth. Select the number of wheel teeth as 20, circular pitch and pressure angle to 10. Repeat for the rest of the gears.
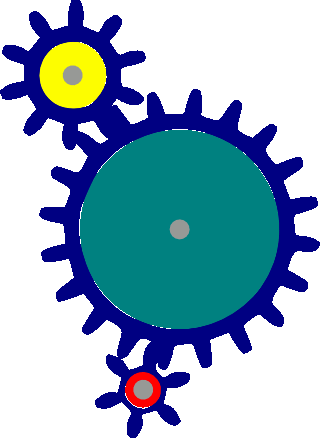
Step 4: Now that you have three gears, move them around in order to adjust themin relation to each other. Later decorate the circles with different colours.
Step 5: The wheels will be moving all the time. So if you don’t centre the cycles, when the gear starts to turn the gear will be moving to the left or to the right, so it is very important to centre the axles. Once you have added the circle, select both by clicking on the Capital letter key + the object, so press that Key and with the mouse select the objects you want to connect.
Later Go to ->Object->Align and distribute. In the next image, the alignment of the vertical axis and the alignment of the horizontal axis are marked by a red rectangle. Now we click on ‘Group selected objects’ to “glue ” all of them together ( this is highlighted in green on the image below) 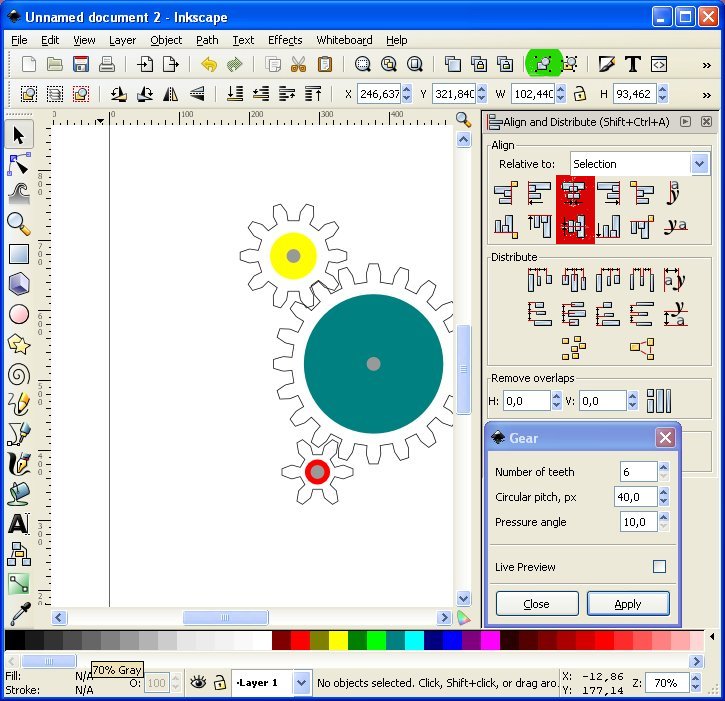
Step 6: You can eliminate the outer line by selecting the nodes. Click on the lefthand menu on “Edit path by nodes”. Then cut out the nodes you want to eliminate
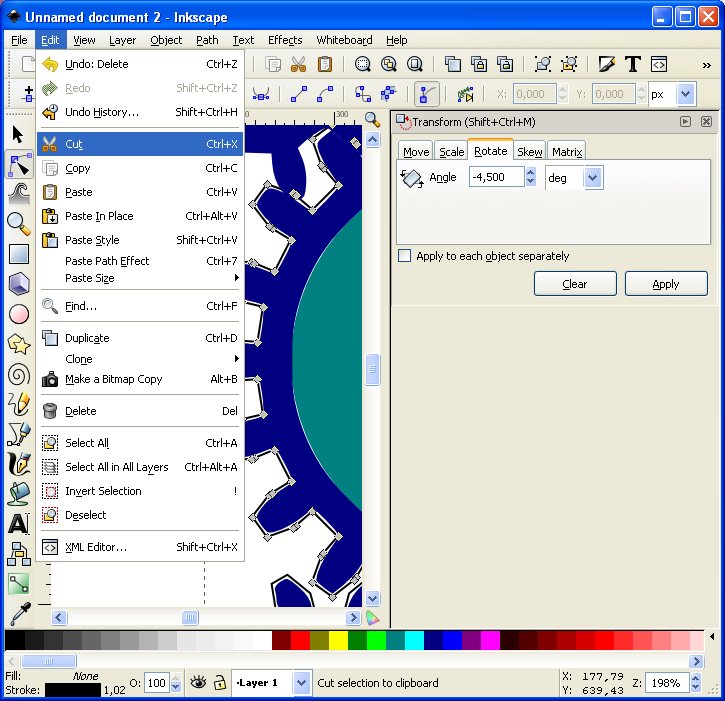
Step 8: Go to Object-> Transform -> Rotate and put in a value to turn the gear clockwise. The question is what value? The appearance of movement we have to give to the gear is produced by a number of images, one after another, enough to move the teeth from one position to the next. Once the teeth reach their starting point again, the first image is repeated and so on. Let’s divide the path between the first position and the last position in 8 frames, so:
• Gear with 10 teeth ——————> 360: 10 = 36º-> 36/ 8 frames = 4.5 ( positive rotation )
• Gear with 20 teeth ——————> 360: 20 = 18º -> 18/ 8 frames = 2.25 ( negative rotation )
• Gear with 6 teeth ——————> 360: 6 = 60º -> 60/ 8 frames = 27.5 ( positive rotation )
Step 9: Select the 10 toothed wheel and rotate it 4.5. Then do the same with the rest of the gears. Save as a bit map with extension png . It is very important to save it as png because png allows transparency and we have to make a gif animation. So the first frame will be saved as frame1.png
Step 10: Repeat step 9 adding another rotation to every gear. Save as frame2.png
Step 11: Open Gimp and open file frame1.png. Then open as layer frame2.png and frame3.png…
Step 12: Now you should have 8 layers. Save as wheel-teeth.gif ( animation image ) and set the delay between frame to 50 milliseconds and the frame disposal to ” One frame per layer( replace )” Finally we have:
Pacman or “Come-coco”
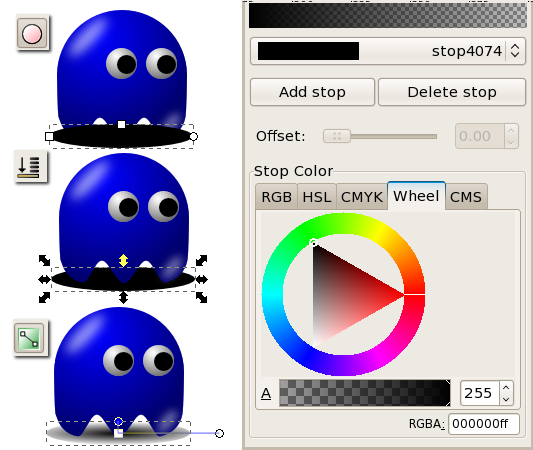
Have you ever played the Come cocos game. Probably, if you are a teenage the answer is no, but it was the most popular video game in the 80s This exercise is very good for learning how to manage paths, so go ahead and design your favourite pacman. Step1: Open a new file in inkscape and draw the PacMan body. The process starts with some node editing, which is the hardest part. For this, draw a circle using the ellipse tool ( For a perfect cycle, select the object and take a good look at width and height above, in the principal menu. Both values should be equal ), then go to Path-> Object to Path to convert the circle into a path. We are going to work with the outer line. The upper half of the circle is ok but the other half has to be modified. To do this place the mouse near the left and right node and add (by double-clicking) two nodes near the extreme left and right nodes ( see next figure) 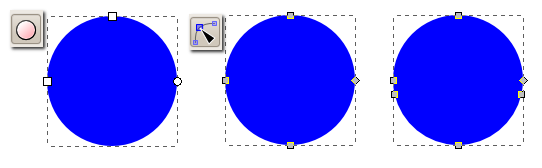 Step 2:Select one of the newly created nodes and drag it to the bottom in order to create a vertical line. Repeat for the other node. Now add two nodes at the bottom of pacman. Move them upwards as shown.
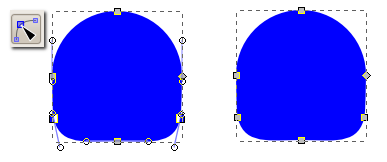
Step 3: Select the newly created right node and the bottom node and add two more nodes at both sides of those nodes. Play with those nodes to create soft lines ( Before we had lines and with this process we have curves) Do the same for the left node at the bottom. Now we have the Legs of our pacman Step 4:The eyes: to do this, draw a white and a black circle and duplicate. Do not align the cycles, just move the black one down and to the right. 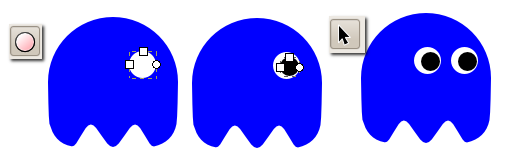
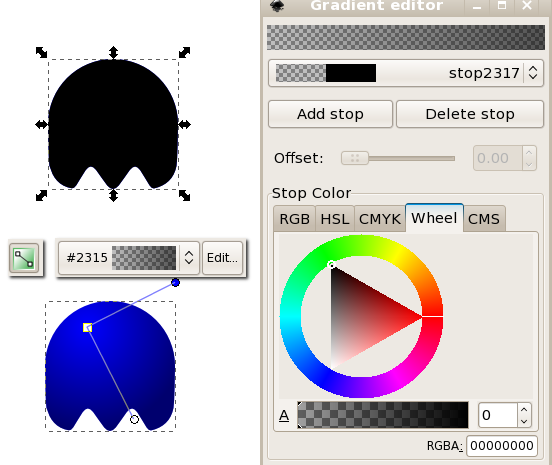
Step 5: A touch of reality. Duplicate the ghost shape ( select the body and click control + C, later click on Control + V ) Go to the copy layer and change the colour to black. Give a radial gradient to that layer. Select Fill and Stroke -> Fill->Radial gradient On the menu on the left, select the gradient icon. Select the centre point and set it to white ( at the bottom there is a colour selection sample. Then go to the opposite point and do it again, but this time, select the colour as black. Now, go to the Fill and Stroke menu and set the opacity to 45%. Align both layers ->Object->Align and distribute. The pacman is now as shown in the next image. Step 6: Creating a shadow. Now, for increased realism, add a black ellipse at the bottom of the pacman, give it a black background and use a radial gradient going from solid black at the centre to white the margins. Set the opacity to 40 %.
Here is our blue pacman.
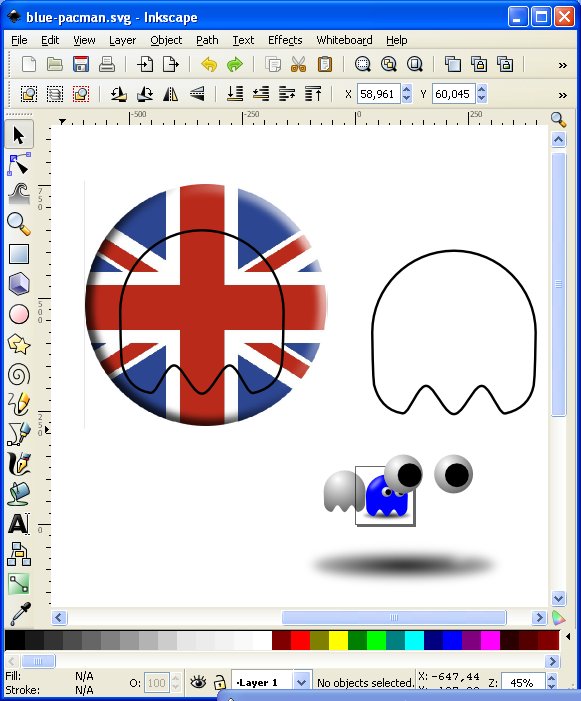
Now, an English Pacman friend
Step 1: Download a Union Jack (British) flag . Open the pacman in the same file. The flag is a bitmap file and to convert it to a vector image go to ->Path->trace bitmap.
Step 2: Select just the body of the pacman and separate from the Pacman. Now change the fill to transparency. In Stroke Style increase the thickness of the outer line and duplicate. Have a look at the next image
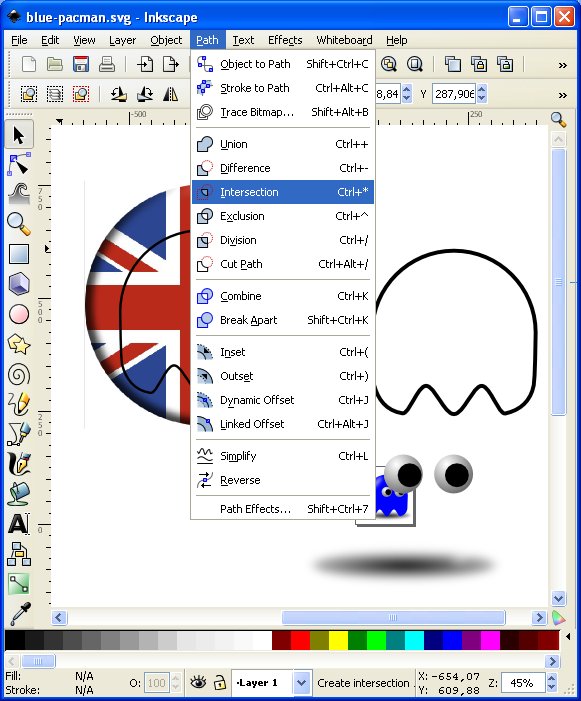
Step 3: Select the flag and the outline and go to ->Path->Intersection. Doing it we generate an english Pacman. The problem is that that image has lost the outline line so use the copy, and selecting both, align as usual. Add the shadow and eyes.
Our English Pacman. But something is missing

Now, a real English Pacman and its Spanish friend

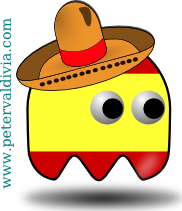
Note. In the case of the Spanish pac man we have to use a Object->Pattern->Object to pattern. Doing that we can create a pattern to fill the pac man form. The process is identical to that described before but in this case we have chosen the Spanish flag and used it to create a pattern to fill the Pacman Exercise: Create an “Extremeño Pacman” and for those who want to improve their inkscape skills, give him a hat or something similar.
Paths : Paths are arbitrary shaped objects.
Wander: move about without any destination
Collide: Crash together with violent impact; eg. “Two meteors collide